
AutoScaling in single AMIMOTO AMI instance is possible.
This article will show the AutoScaling configuration in AMIMOTO AMI.
AutoScaling from the Start
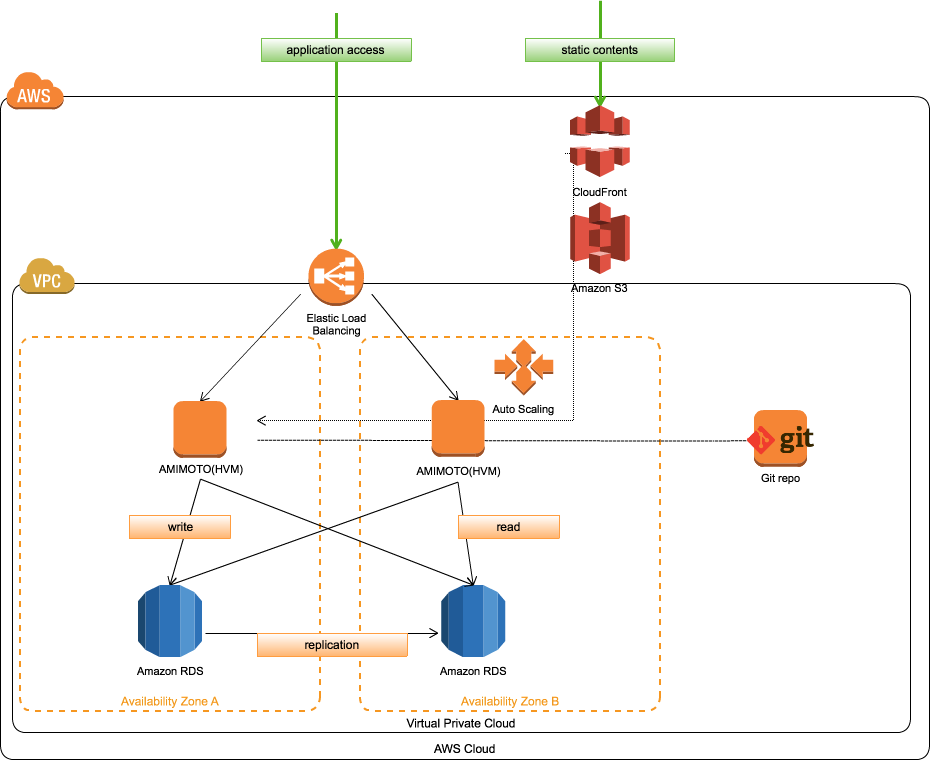
Based on the settings information, the number of EC2 instances on the system can be increased and decreased.
The EC2 instance is placed under ELB (Elastic Load Balancing).
Characteristics:
- It is possible to increase or decrease the instances based on how low or how high the load will be. This makes it cost-efficient since access is unpredictable.
-
Even instances suddenly die, automatic recovery is possible, adjust the number of instances and set according to the minimum number.
Other advantages include:
It’s convenient for you to recover even if using only one instance and it is broken.
You can also reduce cost by automatically adjusting the volume and using spot instance and bidding below the bid price.
Although AutoScaling is convenient, we cannot tell when instances will be discarded.
It might be difficult to manage the servers with the old way like setting once then modifying each time.
The server settings must be managed as a code and should be on the same state.
Also, as the instance will be discarded anytime, the variable data (e.g. for WordPress, MySQL data and media data in wp-content/uploads/ ) should be placed in other places not in those instances.
When using WordPress, please be note of the following:
- Managing core, plugins, and themes with git, not modify the source on the instance directly.
- Managing MySQL on a separate instance like a RDS, not on an EC instance your web server running because the instance will be discarded anytime.
- Media files like uploaded from the WordPress dashboard should be placed in S3.
Media file is uploaded from the WordPress dashboard and will be deployed in S3 - Make Nginx and php-fpm logs possible to see from EC2 by CloudWatch Logs and so on.
Setting up of AutoScaling was used be done with only through AWS CLI, but now it’s possible to set it from AWS management console.
For details on how to set up, please refer to the following URL below.
AWS Developer Guide: Getting Started With AutoScaling
Here we will show you how to set AutoScaling in AMIMOTO AMI.
Adjust the setting of instance startup time
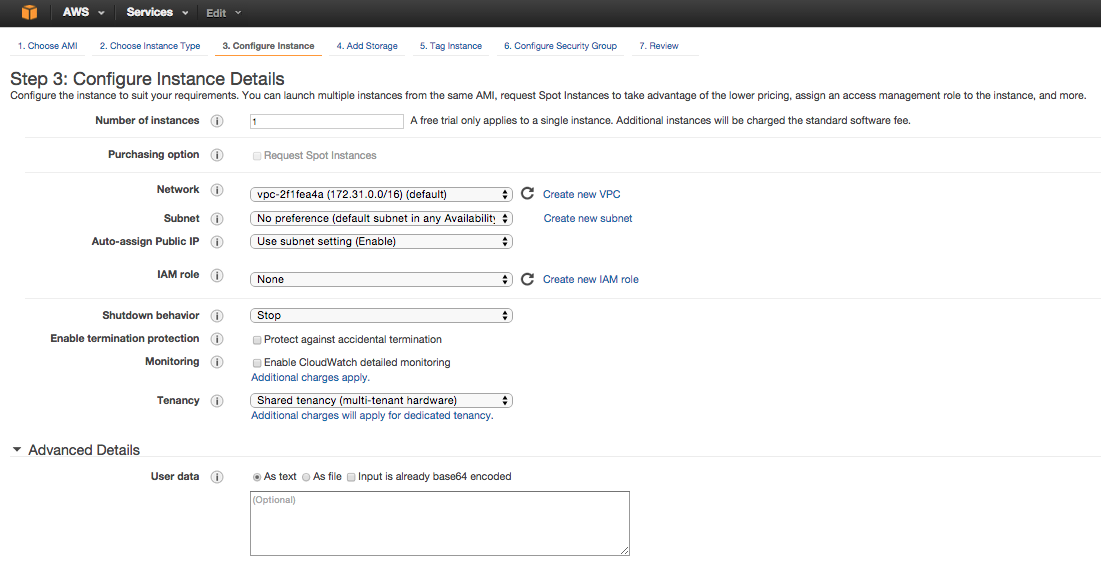
cloud-init is useful to adjust the settings of the instance time startup.
When you launch an EC2 instance, this can be configured in “Step 3: Configure Instance Details.”
Expand Advanced Details at the bottom of the page where you will see User Data where you can input the shell script.
For example, to get a file called initialize.sh from S3 bucket, you have to run a shell script on startup.
#!/bin/sh
region='ap-northeast-1'
s3_bucket="YOUR_S3_BUCKET_HERE"
aws="/usr/bin/aws --region=${region}"

cd /opt/local
${aws} s3 cp s3://${s3_bucket}/initialize.sh /opt/local/
/bin/chmod +x /opt/local/initialize.sh
/opt/local/initialize.sh
For the instance to send request to S3 using aws cli, we should properly set up the IAM role of the instance at the time of EC2 instance launch.
If you are unsure, you can try to put and run the initial script on GitHub.
In User Data you can input not only shell script, but also cloud-init user directive.
For more details, refer to that here: http://cloudinit.readthedocs.org/en/latest/index.html
For example, the initial script has been carried out:
- latest git repository to get from WordPress directory
- Enter connection information for RDS in WP-config.php
- Adjust the configuration file of Nginx
- yum update
In AMIMOTO AMI, we run /opt/local/provision script. This is using chef-solo , which is a script matching the server configuration.
If MySQL uses RDS, there is no need to start the MySQL process. If you place amimoto.json, MySQL in AMIMOTO AMI will not start.
{
  "mysql"    : { "enabled": false },
  "run_list" : [ "recipe[amimoto]" ]
}
### Distribute the modified WordPress source to the instances in the running AutoScaling group
If you can get the instance list of the AutoScaling group, you can distribute the source using a configuration management tool like Ansible.
Using the script below, it’s possible to get the list of instances’ private addresses in a particular AutoScaling group and create hosts file for Ansible.
aws-cli uses jq command, so this must be installed.
#!/bin/sh
ASGROUP='AUTOSCALING_GROUP_NAME_HERE'
ANSIBLE_WRK="${HOME}/ansible"
HOSTS_FILE="${ANSIBLE_WRK}/hosts"

echo "[${ASGROUP}]" > ${HOSTS_FILE}
INSTANCES=`aws autoscaling describe-auto-scaling-groups --auto-scaling-group-names ${ASGROUP} | jq -r ".AutoScalingGroups[].Instances[].InstanceId"`
for INSTANCE in ${INSTANCES}; do
  PRIVATE_IP=`aws ec2 describe-instances --instance-ids ${INSTANCE} | jq -r ".Reservations[].Instances[].PrivateIpAddress"`
  echo ${PRIVATE_IP} >> ${HOSTS_FILE}
done
For example, in the following git repository hook/post-update, push the master branch, ansible makes it possible to distribute the source to all the instances.
#!/bin/sh
#
# An example hook script to prepare a packed repository for use over
# dumb transports.
#
# To enable this hook, rename this file to "post-update".

BRANCH=$(git rev-parse --symbolic --abbrev-ref $1)

if [ "${BRANCH}" = "master" ]; then
  ASGROUP='AUTOSCALING_GROUP_NAME_HERE'
  ANSIBLE_WRK="${HOME}/ansible"
  HOSTS_FILE="${ANSIBLE_WRK}/hosts"

  echo "[${ASGROUP}]" > ${HOSTS_FILE}
  INSTANCES=`aws autoscaling describe-auto-scaling-groups --auto-scaling-group-names ${ASGROUP} | jq -r ".AutoScalingGroups[].Instances[].InstanceId"`
  for INSTANCE in ${INSTANCES}; do
    PRIVATE_IP=`aws ec2 describe-instances --instance-ids ${INSTANCE} | jq -r ".Reservations[].Instances[].PrivateIpAddress"`
    echo ${PRIVATE_IP} >> ${HOSTS_FILE}
  done

  ansible-playbook -i ${HOSTS_FILE} ${ANSIBLE_WRK}/source-sync.yml
fi
Here is the quick rundown of how to setup AutoScaling in AMIMOTO AMI.
Also, all detailed settings are not included.
Contact us if you’re interested in using AutoScaling in AMIMOTO AMI. Please share to us how you run AutoScaling in AMIMOTO.